
When your Atwood furnace quits on a cold night, it’s easy to assume the worst. But before you panic and start shopping for a new unit, take a deep breath. Most furnace problems are surprisingly simple to fix. My first step is always to check the absolute basics: Is the propane turned on at the tanks? Does the battery have enough charge (you need over 11.5V for the fan and igniter)? Is the thermostat set to heat and turned up high enough? It sounds basic, but you’d be amazed how often the “problem” is one of these simple oversights.
Your Pre-Troubleshooting Safety Checklist
Before grabbing your tools, let’s create a logical plan. A methodical approach, combined with a healthy respect for safety, is what separates a quick fix from a costly mistake. The key is understanding the normal sequence of operations so you can pinpoint exactly where the process is failing. It’s not just about replacing parts; it’s about listening to the clues your furnace is giving you.
Know the Normal Furnace Startup Sequence
Think of your furnace’s startup as a specific, timed sequence of events. If any single step fails, the entire process stops cold.
Here’s the normal play-by-play:
- Thermostat Calls for Heat: You raise the thermostat’s setpoint, sending a 12V DC signal to the furnace’s control board.
- Blower Kicks On: The control board starts the blower motor. It runs for about 15-30 seconds to purge any unburnt gases from the combustion chamber. This is a critical safety step.
- Sail Switch Engages: The airflow from the blower pushes a small micro-switch called the sail switch, closing an electrical circuit. This confirms to the control board that the blower is working correctly.
- Ignition Sequence Begins: Once the sail switch is closed, the control board opens the gas valve and sends a high-voltage spark to the igniter. You’ll hear the characteristic click-click-click.
- Flame Is Established: The propane ignites. A flame sensor probe, positioned in the flame, confirms ignition and tells the control board to keep the gas valve open. If it doesn’t sense a flame within a few seconds, the board shuts off the gas for safety.
To help you quickly diagnose the issue, here’s a table that matches common symptoms to the most likely culprits.
Common Atwood Furnace Symptoms and Initial Checks
| Symptom | Most Likely Cause | First Thing to Check |
|---|---|---|
| Nothing happens at all | No power or thermostat issue | Battery voltage (>11.5V), furnace fuse, thermostat connection |
| Blower runs, but no clicking/ignition | Sail switch or limit switch issue | Check for obstructions in vents, listen for sail switch “click” |
| Blower runs, furnace clicks, but won’t light | Propane supply or igniter fault | Propane tank levels, stove burners light, igniter spark |
| Furnace lights briefly, then shuts off | Flame sensor or control board issue | Clean the flame sensor rod, inspect control board for damage |
| Blower runs constantly, no heat | Limit switch tripped or faulty | Check for blocked ducts, reset by cycling power, test switch |
This table provides a solid starting point before you begin disassembling and testing components.
Non-Negotiable Safety First Steps
Working with propane and 12V electricity demands respect. Before you open the furnace access panel, perform these two steps every single time:
- Shut Off the Propane: Go to your exterior propane tanks and turn the service valves completely off.
- Kill the 12V Power: Use your RV’s main battery disconnect switch or pull the fuse labeled “Furnace” from your 12V fuse panel. This ensures no component can activate while you’re working on it.
This flowchart helps visualize the troubleshooting process.
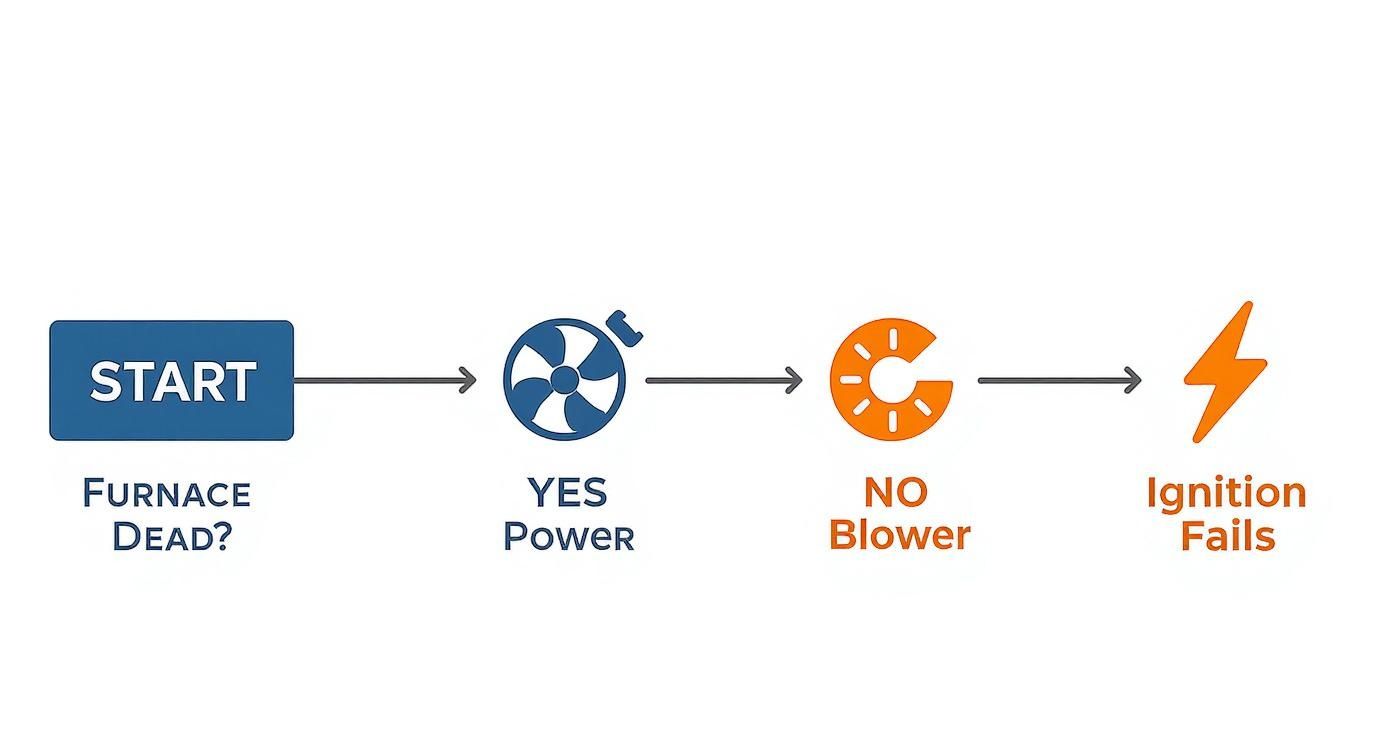
Troubleshooting is a process of elimination, starting with the simplest systems like power and airflow before suspecting more complex components.
Atwood Hydro Flame furnaces, now part of the Dometic family, are the workhorses of the RV industry. In my experience, a significant majority—easily 60-70%—of RV heating problems stem from simple issues like low propane, sail switch failures, or blocked airflow, not a catastrophic furnace failure. The sail switch is a particularly common culprit; a small piece of lint or even a spider web can prevent it from working. Following a logical diagnostic path is key. For more real-world repair scenarios, check out the forums on AccelerateNetZero.com.
Solving the Most Common No-Heat Problems
It’s one of the most common issues RVers face: the furnace blower runs, but it never produces heat. The good news is that a running blower is a positive sign. It confirms the thermostat is sending a signal and the control board has power.
Your task is to find which safety or ignition component is halting the sequence. This is where a multimeter becomes your most valuable tool. We will systematically test the most frequent offenders. Each test provides a clear “pass” or “fail” result, turning a confusing problem into a straightforward fix. This structured approach to atwood rv furnace troubleshooting saves you time and money by preventing you from replacing perfectly good parts.
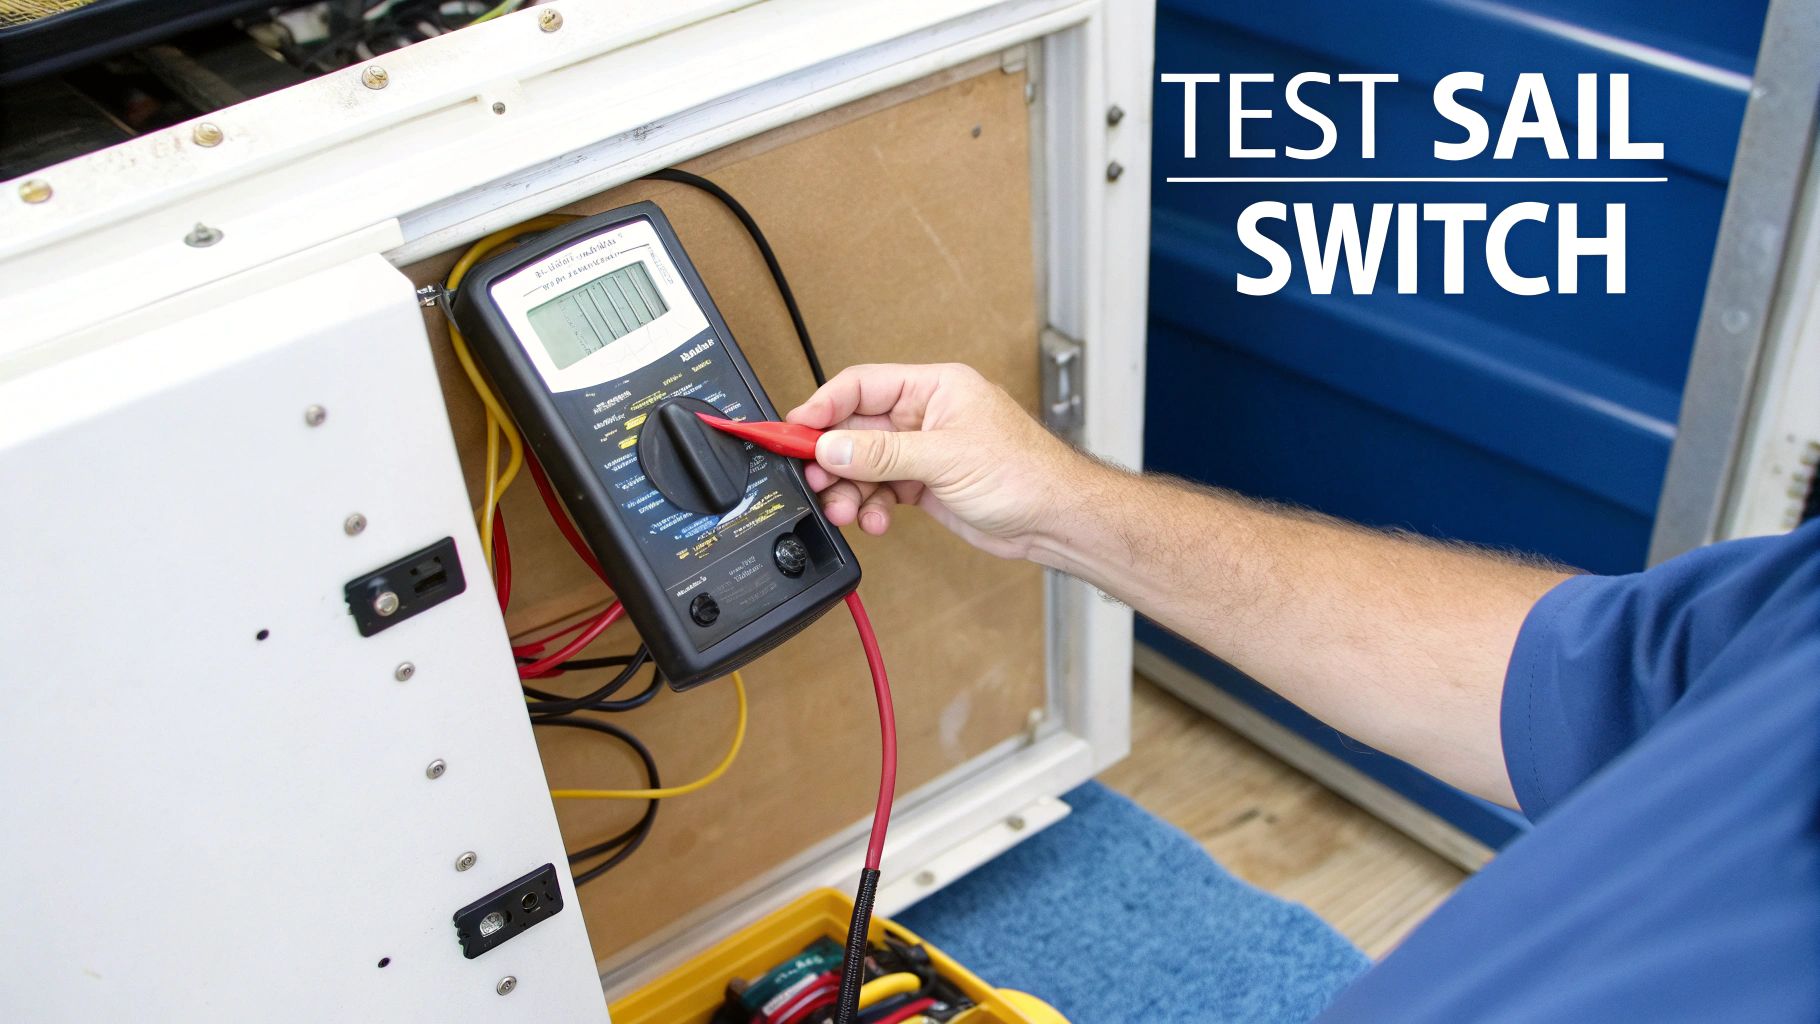
Testing the Sail Switch
The sail switch is a small micro-switch with a plastic “sail” or paddle that is pushed by the air from the blower. Its sole function is to verify adequate airflow before allowing the furnace to ignite. If this switch is dirty, stuck, or broken, the control board never receives the “all clear” signal to open the gas valve.
First, shut off the power and propane. The switch is located on the blower motor housing. You can often test its mechanical function by reaching it with a finger. Does the sail move freely and make a faint clicking sound? If it’s sticky or silent, you’ve found a major clue.
To test it electrically with your multimeter:
- Set the multimeter to the continuity setting (it often has a symbol that looks like a sound wave).
- Disconnect the two wires from the switch’s terminals.
- Touch one probe to each terminal. With the sail at rest, there should be no continuity (an open circuit, displayed as “OL” on most meters).
- While keeping the probes on the terminals, manually push the sail to activate the switch. You should hear a beep from your meter and see a reading near zero, indicating a closed circuit.
If the switch fails to close the circuit when you push the sail, it needs to be replaced. This is an extremely common point of failure. I’ve seen everything from dust bunnies and pet hair to insect nests prevent these switches from working. You can find replacement options by searching for Atwood/Dometic furnace sail switches.
Pro Tip: Sometimes a sail switch is electrically fine but physically obstructed. A quick blast of canned air can often dislodge debris and solve the problem without requiring a new part.
Checking the High-Limit Switch
Next in the safety chain is the high-limit switch. This device is designed to shut down the furnace if it overheats, which is often caused by blocked or crushed heating ducts. If this switch trips and then fails in the open position, it will prevent ignition, even though the blower will continue to run.
The high-limit switch is a small, round component, typically mounted directly on the combustion chamber, with two wires attached. A functioning switch should automatically reset once the furnace cools down. However, these switches can fail permanently, leading to the endless blower cycle.
Testing is identical to the sail switch test. With the power off, disconnect the wires and place your multimeter probes on the two terminals. A good high-limit switch should show immediate continuity at room temperature. If your meter shows an open circuit (“OL”), the switch has failed and must be replaced.
Fortunately, a new switch is an inexpensive part available at most RV parts suppliers, like the Atwood/Dometic furnace parts section under RV Furnaces & Heaters at RVupgrades.com.
Fixing Failures in Ignition and Flame
You hear the blower motor start, but the reassuring whoosh of ignition never comes. This is a classic symptom. Because the blower is running, you know the thermostat and control board have power. The problem is almost always further down the sequence—right where spark and fuel are supposed to meet.
This stage of your atwood rv furnace troubleshooting involves inspecting the components that create and sustain the flame. These checks are surprisingly straightforward and often reveal a simple, inexpensive fix. We’ll cover the two most common failure scenarios: the furnace won’t light at all, or it lights briefly and then shuts down.
Inspecting the Igniter Assembly
The igniter acts as the spark plug for your furnace. It creates a high-voltage arc to light the propane. Over time, it can develop hairline cracks, become coated in soot, or its metal probe can get bent out of position.
First, turn off all power and shut off the propane at the tank. Locate the igniter, a ceramic-insulated probe positioned right at the burner. A bright flashlight is essential for this inspection.
- Look for Cracks: Carefully examine the white ceramic insulator. Tiny, hairline fractures can cause the spark to ground against the furnace chassis instead of jumping the gap to ignite the gas. If you see any cracks, the igniter must be replaced.
- Check for Soot: A layer of black soot can insulate the probe, weakening the spark. Gently clean it with a piece of fine-grit sandpaper or an emery board to expose the bare metal.
- Verify the Gap: The distance between the igniter probe and the ground is critical. The gap should be approximately 1/8 of an inch. If it looks different, you can gently bend the ground tab to adjust it.
Distinguishing Ignition Failure from Flame Sense Failure
Listening carefully to the startup sequence will help you differentiate between two very different failure modes.
The first is a total failure to ignite. The blower runs, you might hear the soft click of the gas valve opening, but you never hear the rapid tick-tick-tick of the igniter sparking. This usually points to a bad igniter, a faulty control board that isn’t sending voltage to the igniter, or a gas valve that isn’t opening.
The second scenario is very common: the furnace lights but shuts down after just a few seconds.
This is the classic symptom of a dirty or failed flame sensor. The furnace ignites successfully, but the control board doesn’t receive the “flame present” signal, so it shuts off the gas as a safety precaution.
The flame sensor is often integrated into the igniter assembly. Its job is to sit in the flame and send a tiny electrical signal back to the control board. Cleaning this metal rod with sandpaper, just as you would the igniter, often resolves the issue instantly. If cleaning doesn’t work, the sensor (or the entire igniter/sensor assembly) is likely faulty and needs to be replaced—a common and relatively easy task for most RVers. You can find compatible parts by searching for Atwood/Dometic furnace igniters.
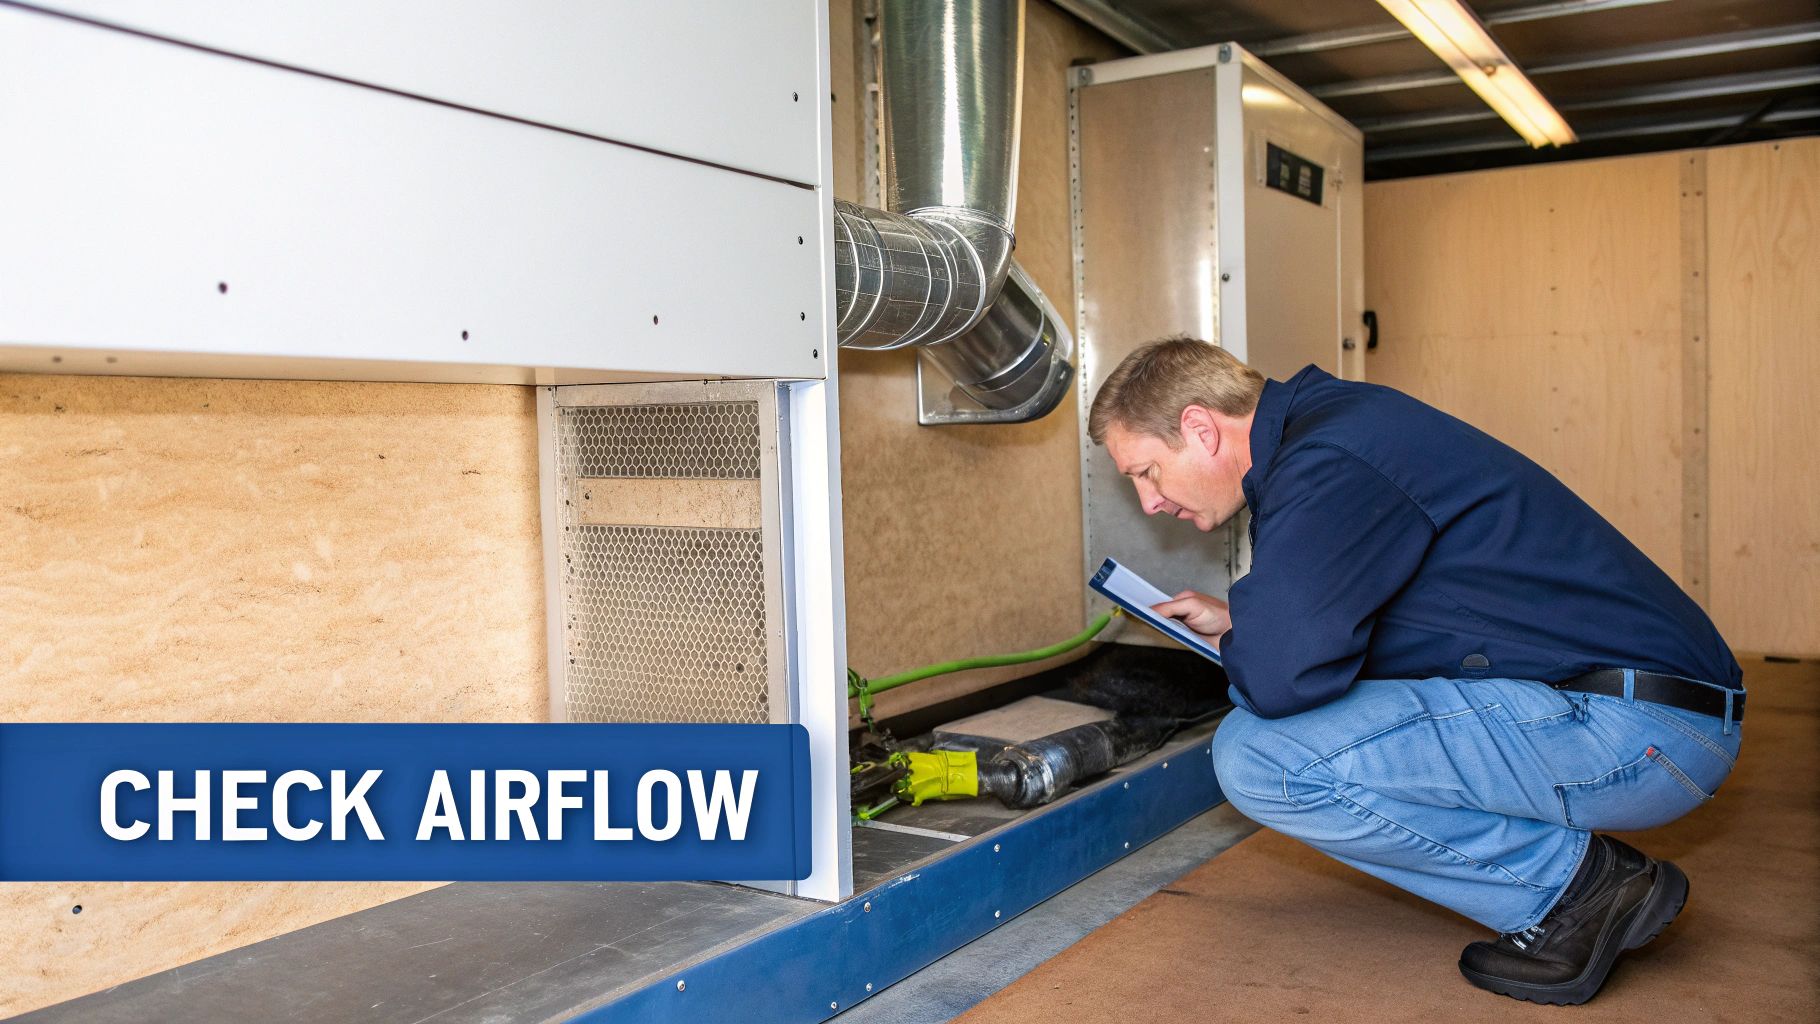
Dealing with Airflow and Blower Motor Faults
Your Atwood furnace needs to breathe. Restricted airflow can cause it to overheat and shut down. This is one of the most common reasons a furnace will cycle on and off or stop working altogether. When this happens, the high-limit switch is simply doing its job by cutting power to prevent damage or a fire.
Becoming an airflow detective is a critical part of atwood rv furnace troubleshooting. Often, the fix doesn’t require any tools—just a keen eye and a few minutes of inspection. The problem is frequently much simpler than you think.
Inspecting Ductwork and Vents
The furnace’s ductwork is its respiratory system. If any part of it is blocked or damaged, the entire system suffers. Start with a visual inspection of all flexible ducting in storage bays, under cabinets, and anywhere else it runs.
- Crushed Ducts: This is a very common issue. Cargo shifts in a storage bay and flattens the flexible ducting, severely restricting airflow.
- Disconnected Segments: Check where ducts connect to the furnace plenum and floor registers. It’s easy for a connection to pop off, dumping hot air into the RV’s underbelly instead of the living space.
- Blocked Vents: This is the easiest fix of all. Ensure furniture, bags, or rugs are not covering the return air grille or the heat registers.
A furnace pushing air against a blockage is like you trying to breathe through a pinched straw. The system overheats, trips the high-limit switch, and shuts down. Simply moving a piece of luggage off a vent can instantly solve what seems like a major furnace failure.
If all the ductwork is clear but you still suspect an airflow issue, the problem might be the blower motor itself. This motor is the heart of the air circulation system, and when it starts to fail, everything stops.
Diagnosing the Blower Motor
The blower motor performs two vital jobs: it purges the combustion chamber before ignition and then circulates warm air throughout your RV. A failing motor usually provides warning signs before it quits completely.
Listen carefully when the thermostat calls for heat. A high-pitched squeal or a low grinding noise are classic signs of worn-out motor bearings, indicating it will need replacement soon.
If the motor doesn’t spin at all, you can perform a quick voltage test. First, kill the power to the furnace. Access the blower and find its two power wires. Set your multimeter to DC voltage (the 20V scale is ideal). Have a helper turn up the thermostat. Carefully touch your multimeter probes to the two motor terminals.
If you get a reading of 12V DC or more, it means the motor is receiving power but not running. This confirms the motor has failed. If you read 0V, the problem is upstream—likely the control board or wiring—and the motor is probably fine. You can find replacement motors and other furnace components in the RV Furnaces & Heaters section at RVupgrades.com to restore your heat.
Checking the Control Board and Propane System
If you’ve tested the individual components like the sail switch and igniter and they all check out, it’s time to investigate the furnace’s command center and fuel supply. The control board and propane system are the final major areas in your Atwood RV furnace troubleshooting. Confirming their operation will either solve the problem or confirm a fault in a component you previously checked.
The control board is the furnace’s brain. It receives a signal from the thermostat, verifies status from the safety switches, and then directs the blower, gas valve, and igniter. A faulty board can create confusing symptoms that mimic other problems.
Inspecting the Furnace Control Board
A thorough visual inspection can reveal a lot before you even touch a multimeter. First, kill the 12V power and shut off the propane at the tank. Locate the control board, which is usually housed in a protective plastic case.
Look for these telltale signs of a failed board:
- Burn Marks: Check for dark or scorched spots, especially around solder joints or resistors. This is a clear indication that a component has overheated and failed.
- Water Damage: Any sign of corrosion—often a chalky white or greenish powder—means moisture has entered and shorted something out.
- Loose Wires: Gently tug on each wire to ensure it is secure in its connector. A loose connection can be as problematic as a broken component.
If the board looks visually perfect, you can perform a basic voltage test. Turn the 12V power back on and have someone turn on the thermostat. Use your multimeter to check for 12V DC at the main power input terminals on the board. If you have power coming in, but the board is not sending voltage out to the blower motor, you have likely found your culprit.
Replacing a control board sounds intimidating, but it’s often a simple plug-and-play procedure. A great tip is to take a clear photo of the wiring with your phone before disconnecting anything. This makes reconnecting the new board nearly foolproof.
Verifying the Propane System
A furnace that clicks and sparks but never ignites is a classic sign of a fuel delivery problem. Don’t just rely on your tank gauges; confirm that gas is flowing all the way to the furnace.
The easiest way to check your propane system is to test other gas appliances. Can you light all the burners on your stove? Does your propane water heater fire up reliably? If they work correctly, your primary regulator and supply lines are likely fine.
Next, listen closely at the furnace’s exterior vent during an ignition attempt. Just before the igniter starts ticking, you should hear a distinct click or thunk. That is the sound of the gas valve’s solenoid opening. If you hear the igniter sparking but never hear that initial click, the gas valve is either not receiving the command from the control board or the valve itself has failed.
This methodical process—checking the board, then the fuel—helps you confidently eliminate two major variables, bringing you one step closer to a warm RV. If you identify a faulty component, you can explore a wide variety of replacement Atwood/Dometic furnace parts, control boards, and gas valves at RVupgrades.com.
Answering Your Top Furnace Questions
Even after going through the diagnostic steps, some common scenarios can still be confusing. Let’s tackle some of the most frequent questions RVers have about their Atwood RV furnace.
These are the issues that repeatedly appear in online forums and at campgrounds. Understanding why they happen will make you a more effective troubleshooter.
My Atwood Furnace Clicks But Won’t Ignite
Hearing the click of the gas valve is good news—it means the control board is trying to start the sequence. If it never ignites, you have a spark or fuel problem.
Here’s the checklist:
- Propane Supply: I know it’s basic, but are your tanks full and the valves fully open? Light a stove burner to confirm gas is flowing through the system.
- Igniter Probe: This component is a common failure point. Inspect it for hairline cracks in the ceramic insulator. If it’s just sooty, clean the metal probe with fine sandpaper. Also, verify the gap is about 1/8 of an inch.
- RV Battery Voltage: This is a common and often overlooked cause. If your battery voltage drops below 11.5V under load, the igniter may not have enough power to create a strong enough spark to light the propane, even if the fan runs.
The Blower Runs Constantly, But I Get No Heat
This is a classic symptom with a very specific cause. When the blower runs continuously without heat, the problem is almost always a failure in the furnace’s safety circuit, with the sail switch being the prime suspect.
The blower normally runs for 15-30 seconds as a pre-purge cycle. This airflow is what closes the sail switch. If that switch is stuck open—due to lint, debris, or electrical failure—the control board never gets the “all clear” signal to open the gas valve and start the igniter. The blower will simply continue to run, waiting for a signal that never arrives. Your first step should always be to access and test the sail switch.
Think of the furnace startup as a chain of dominoes. The blower running proves the thermostat is working. The sail switch is the very next domino that must fall for the sequence to continue.
How Do I Reset My Furnace After a Lockout?
Atwood and Dometic furnaces have a built-in safety lockout mode. If the furnace fails to ignite after three attempts, the control board will shut down the ignition sequence to prevent the unsafe buildup of raw propane.
Resetting the furnace is simple:
- Go to your RV’s thermostat and switch the system completely to the “Off” position.
- Wait for 30 seconds to a minute. This allows the control board’s internal logic to fully reset.
- Switch the thermostat back to “Heat” and set your desired temperature.
This will initiate a new ignition cycle. If the furnace tries to light and immediately goes back into lockout mode, it confirms you have a persistent ignition or flame-sensing problem that needs to be diagnosed using the steps we’ve covered.
For all the Dometic and Atwood replacement parts you need—from sail switches and limit switches to blower motors and control boards—RVupgrades.com has a massive selection to get your furnace back in working order. Start in the RV Furnaces & Heaters section or search directly for your part number at RVupgrades.com.


